Creating Access Tokens Using a Custom Integration
Creating Access Tokens for DataTrails
Non-interactive access to the DataTrails platform is managed by creating Integrations with either a Custom Integration or one of the built-in Integrations. This is done using either the Settings or Integrations menus in the DataTrails UI or by using the App Registrations API directly.
Note: App Registration is the old name for a Custom Integration.
Custom Integrations have a CLIENT_ID and a SECRET, these are used to authenticate with DataTrails IAM endpoints using
JSON Web Tokens (JWT).
DataTrails authentication uses the industry-standard OIDC Client Credentials Flow.
The high level steps are:
- Create an Integration in the UI
- Define access permissions for the Integration in the UI
- Request an Access Token using the API
- Use the Access Token to make a REST API call to your tenancy.
Creating a Custom Integration
If you have already saved a CLIENT_ID and a SECRET, with the correct
permissions applied, skip to
Getting a Token With the Custom Integration
Note: Creating App Registrations requires Tenancy Administrator privileges.
IfSettingsorIntegrationsdoes not appear in the navigation, see your DataTrails Administrator for access.
Using the DataTrails App to Create an Integration (First-Time Setup)
- As an Administrator, open the DataTrails App
- Navigate to
Integrationson the sidebar - This opens
Settingswith theIntegrationstab automatically selected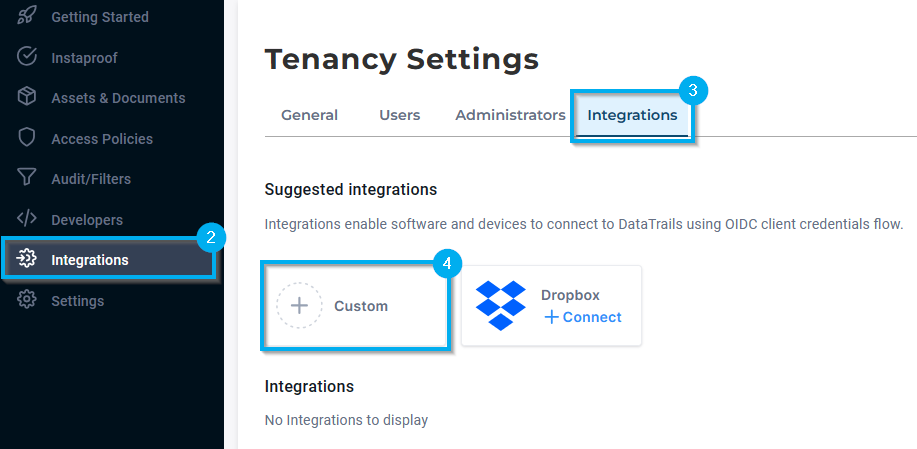
Navigate to Settings, then Integration - Click the
Custombox to create a Custom Integration - Enter any
Display Nameyou’d like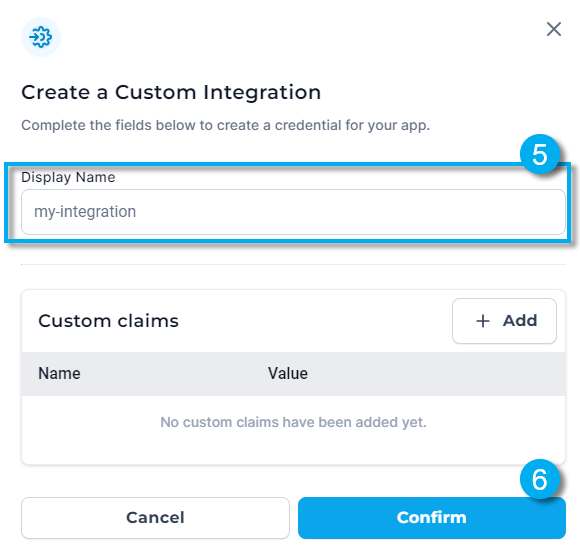
Completed Web Registration Note: Optionally add any
Custom claimsat this step by clicking the+ Addbutton.
In this context, claims are pieces of information that are asserted in a JSON Web Token (JWT). Registered claims are name/value pairs that are defined by the JWT standard, Custom claims are not defined and can have any name/value combination. .Ensure the
Namedoes not start withjit_orarc_(DataTrails reserved names) or use any other well-known reserved claims.See here for more information on JWT Claims
- Once complete, click
Confirmto complete the custom integration - You will then be presented with the
CLIENT_IDandSECRETrequired by the archivist token endpoint
Record your Client ID and Secret Caution: Save theCLIENT_IDandSECRETto a password manager or secret management service as theSECRETcan not be viewed again. A newSECRETcan be regenerated in the Integration configuration screen but this replaces and invalidates the previousSECRET.

Grant Access Permissions to your Custom Integration
In this section we will give your Custom Integration permission to access the Assets, their attributes, and Events that have been recorded in your tenancy.
Integrations are secured by default, with no read or write permissions within your DataTrails Tenancy. This is is important because the alternative would be to allow read/write access to all Assets and Events by default which opens the risk that an application could be maliciously altered to make changes that would not be permitted by the Tenancy Administrator.
The steps below show how to create and assign an Access Policy to control the ability to create and read DataTrails information.
For convenience we will grant full access rights to the customer integration in this example. Please see
this article for information on setting up more finely controlled access.
- Navigate to
Access Policieson the sidebar
Access Policies - Click
CREATE POLICY, setting theNameandAsset Types=*for all typesNote: Asset types can be filtered as needed. List existingAsset Typesby typing at least two characters of a known type
Create Access Policy Form - Click
Permissionsto set a scope for the policy - Set Actors to the
CLIENT_IDof the Custom IntegrationUserSubject Identifier- Paste the
CLIENT_IDfrom the previous step
Filter on User by Subject Identifier using the CLIENT_ID
- Set Attribute Access and Event Visibility to
AllNote: Each policy can be configured with multiple access rights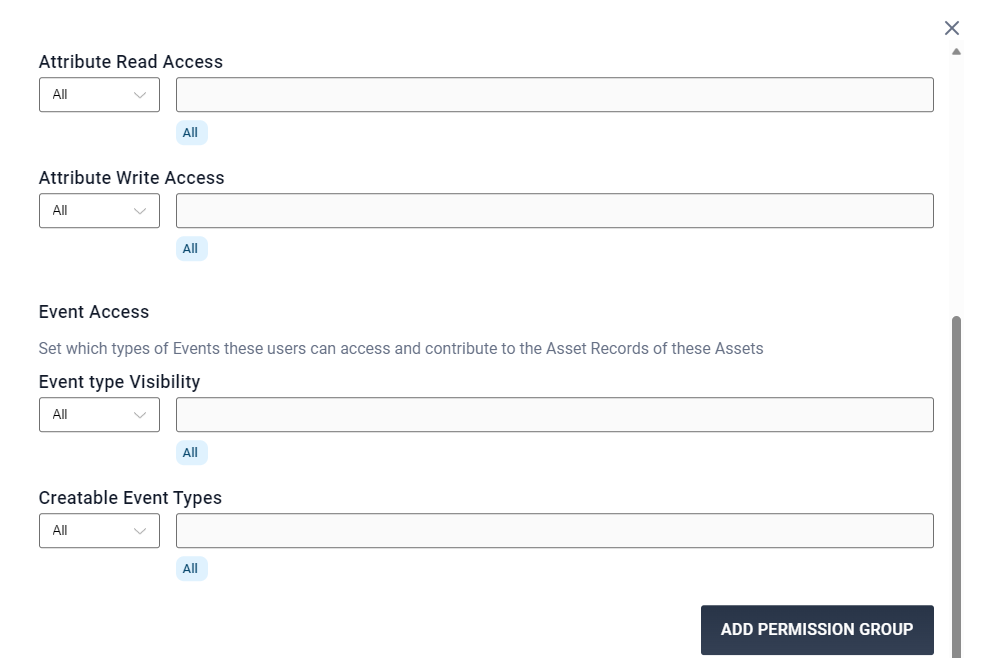
Set Attribute Access and Event Visibility - Click the
ADD PERMISSION GROUPto save the configuration of this policy - Click the
CREATE POLICYto complete the creation of this policy


Getting a Token With the Custom Integration
Having completed the steps to create a
custom integration and
grant access permissions, and having taken note of the CLIENT_ID and the SECRET, a token can be obtained with the following command.
Note: To make things easy we will use local variables and files to store the credentials and token but you can use any method that you wish.
Save the
CLIENT_IDandSECRETsaved from above, to local variablesNote: Remember that you can regenerate the secret but this will invalidate the previous credentials which may be being used by other applicationsCLIENT_ID=your_id SECRET=your_secretGenerate a token using your pre-existing
Custom Integrationdetails, saving to aRESPONSEvariableRESPONSE=$(curl https://app.datatrails.ai/archivist/iam/v1/appidp/token \ --data-urlencode "grant_type=client_credentials" \ --data-urlencode "client_id=${CLIENT_ID}" \ --data-urlencode "client_secret=${SECRET}") echo $RESPONSESave the base64 encoded
JWTusingjqto find.access_token(See ./jq for more info)TOKEN=$(echo -n $RESPONSE | jq -r .access_token) echo $TOKENCreate a Bearer Token file for reference by
curlcommands, in an./datatrails/directorymkdir -p $HOME/.datatrails chmod 0700 $HOME/.datatrails echo Authorization: Bearer $TOKEN > $HOME/.datatrails/bearer-token.txt cat $HOME/.datatrails/bearer-token.txt
Testing Token Creation
You can test access to the DataTrails API using any of the standard API calls. GETing Assets is a simple test.
If successful, you will see a list of the assets the Integration has access to in the tenancy.
Note: This may be an empty response if no assets are being shared with the Integration because an Access Policy has not been created for it; this is an expected secure by default behavior.
Otherwise, check the Assets OpenAPI Reference for more detailed information on the response codes you may expect if authentication fails and what they mean.
View Existing Assets
To test the creation of the Custom integration and the configuration of the bearer token file (bearer-token.txt), query the assets API
curl -X GET -H "@$HOME/.datatrails/bearer-token.txt" \
    https://app.datatrails.ai/archivist/v2/assets | jq
If you have existing assets, the output will be similar to:
{
  "assets": [
    {
      "identity": "assets/xxxxxxxx-xxxx-xxxx-xxxx-xxxxxxxxxxxx",
      "behaviours": [
        "AssetCreator",
        "RecordEvidence",
        "Builtin"
      ],
      "attributes": {
        "length": "40'",
        "weight": "20000-lbs",
        "width": "8'",
        "arc_description": "A shipping container being tracked",
        "arc_display_name": "New Shipping Container #1",
        "arc_display_type": "Shipping Container",
        "arc_home_location_identity": "locations/xxxxxxxx-xxxx-xxxx-xxxx-xxxxxxxxxxxx",
        "height": "8'"
      },
      "confirmation_status": "COMMITTED",
      "tracked": "TRACKED",
      "owner": "xxxxxxxxxxxxxxxxxxxxxxxxxxxxxxxxxxxxxxxxxx",
      "at_time": "2023-09-22T03:39:46Z",
      "storage_integrity": "TENANT_STORAGE",
      "chain_id": "8275868384",
      "public": false,
      "tenant_identity": "tenant/xxxxxxxx-xxxx-xxxx-xxxx-xxxxxxxxxxxx"
    }
  ],
  "next_page_token": ""
}
If the output is an empty structure, you may either not have any assets, or misconfigured the Access Policy.
{
  "assets": [],
  "next_page_token": ""
}
In the DataTrails App, Navigate to Assets confirm existing assets. If assets exist, confirm the CLIENT_ID, SECRET and Access Policy are configured and referenced properly.
Troubleshooting Token Generation
The header and payload of the TOKEN may be examined with the following commands. This is useful when investigating if tokens contain the correct custom claims or tokens that may appear malformed.
Warning: Decoding tokens with an online service exposes details about your DataTrails token credentials. Remember to regenerate the credentials when troubleshooting is complete.
View the Header
echo -n $TOKEN | cut -d '.' -f 1 | base64 -d | jqGenerates output similar to:
{
  "alg": "RS256",
  "typ": "at+jwt",
  "kid": "devidp"
}
View the Payload
echo -n $TOKEN | cut -d '.' -f 2 | base64 -d | jqGenerates output similar to:
{
  "jit_tenant_id": "tenant/xxxxxxxx-xxxx-xxxx-xxxx-xxxxxxxxxxxx",
  "name": "my-token",
  "jit_tier": "FREE",
  "jti": "CCIH_QsZsM6FKzwBR6L5Z",
  "sub": "xxxxxxxx-xxxx-xxxx-xxxx-xxxxxxxxxxxx",
  "iat": 1695254038,
  "exp": 1695257698,
  "client_id": "xxxxxxxx-xxxx-xxxx-xxxx-xxxxxxxxxxxx",
  "iss": "https://app.datatrails.ai/appidpv1",
  "aud": "https://app.datatrails.ai/archivist"
}